
1st Semester
Rube Goldberg Machine
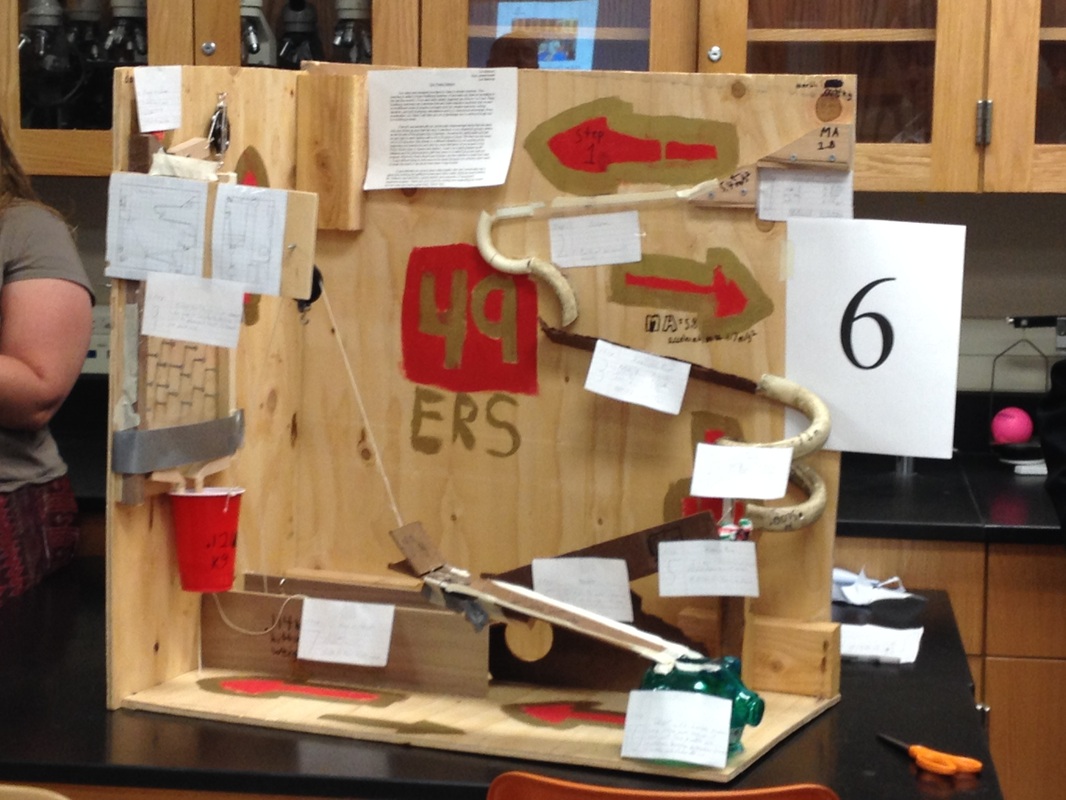
The Rube Goldberg is a project in which you would use a complicated series of actions to do the most simplistic of tasks. Our Rube Goldberg was designed to deposit coins into a bank. We were able to accomplish this task with the use of 5 simple machines including, levers, wedges, pulleys, a screw, and an inclined plane. To spice things up a little, we added a bit of 49'ers flare to the project.
Within our machine, we were able to find the forces on objects, the acceleration of a marble, the MA(mechanical advantage), and velocity of other objects. We started our project with 3 inclined planes. As the marble rolls down the inclined planes, the marble falls into a screw. The marble then gains speed, abruptly stopping as it transfers it's energy to the domino at the bottom of the screw. As the domino is dislodged form it's former position, the wedge below the car at the top of a ramp. The car falls down the ramp, which moves a weight off of a string. The string moves a lever allowing marbles to fall down a PLINKO machine. Yes, I said, "Plinko machine". The marbles then fall into a cup which acts as weight to lift a lever. This raised the lever that deposits the coins into the piggybank. During our project, I learned that working with new people was its difficulties but it also brings new challenges along the way. Life always need challenges. I also learned that i'm pretty good with power tools. With these ups there has got a downside right? Our down side was our inability to even distribute jobs and tasks. we also had problems with handling each others personalities. Our group had our ups and downs, but I think it turned out great. Our group had lots of fun and are looking forward to our next project, Physics of Sports Video. |
|
Physics of Sports Video
The Physics of Sports Video was our 3rd STEM Marin project. My partners in this project were Rachel Peterson and Mikayla DeBarros. Our idea for this video came from the fact that we want something that was unique and most likely would not be chosen by others. We chose horse jumping because it was both unique and a smart choice because Rachel has a horse over at Morning Star Farms across the street from San Marin High School. We quickly divided up the work for the assignment without incident. Most of the video was shot on our beautiful San Marin campus. The other scenes were filmed at Morning Star farms. We spent one and a half days planning the project, two days filming, and the time was spent editing our math and footage. I personally think the project went smoothly. There was little to no conflict with in our group. That prevented us from getting off track. The video had one or two flaws but overall was very well. If we had more time and patience, I believe we could have ironed out the flaws. I personally could have tried harder to stay focused during the project. I loved the way we shot our film. Rachel chose to film in very cinematic environments, which mad our film look amazing. I couldn't have asked for a better turnout.
Force - The weight of the horse as it pushed off the ground.
Pythagorean Theorem - A^2 + B^2 = C^2(formula) used to find the velocity of the horse.
Parabola - Open symmetrical curve that represented the path of the horse's jump.
Acceleration - speed of the horse.
Velocity - speed of the horse in a given direction.
Impulse - Amount of force applied to the horse's legs as it lands and for how long it stayed connected to the ground.
Hybrid Car Battery Design
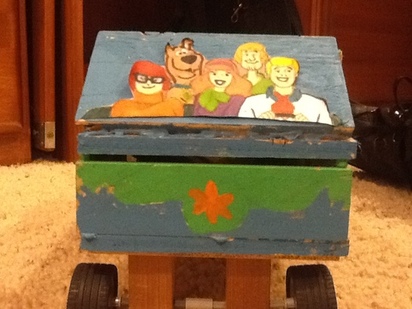
For this project, I worked with Emily Claire Schneider and Garrett Hoefer. The challenge was to build a hybrid car that would solve our 2 problems which were: make a car that can go exactly five meters with s non-gasoline power source. This project was made possible by "Lego Mindstorms" which are programmable and can be used to preform certain tasks. As you can see, we decided our car should look like the Mystery Machine.
Because of multiple factors, our car did not preform to our expectations. Our major problem was friction, both on the floor and within the battery. this caused our car to not only drive slower than we expected it to be but also caused the velocity to fluctuate slightly. the places with the most friction on the car were the axles in the back tires where the motors were and within the control module where the battery is located. The friction on the rear axles was caused by both human error and faulty motors. Those motors weren't t the best ones we could have used. the were fairly used and cant support much weight. Garrett and I also placed the motors at a slight angle which we fixed it the best of our ability. The battery gave off a lot of heat and noise through fiction. We couldn't do much about the heat but we did dampen the noise with felt and cloth. Unfortunately the cloth didn't work as well as we had hoped.
Overall it think the project went great. We had no trouble dividing the work evenly and coming up with ideas for the car. Referring to my earlier note, our biggest problem was the sound of the battery. If we had more time on the project we would have gotten a more effective material. WE also had a problem with the lose of some of our research. luckily we redid the lost portion of the data and came up with even more accurate information. Our group was very productive which leads me to think that we did our best, given the amount of time, on this project.
Friction - Resistance of movement that results in heat and/or noise
Acceleration - speed of the car
Velocity - speed of the car in a given direction

Engineering Design Project
About
The last project of the first semester asked us to help solve what we thought was a world problem. I accomplished this task with my former members Garrett and Emilie Claire along with our newest addition, Austin. The entire class came up with many different and crazy ideas including, nut not limited to: hair loss, Sharknado, poverty, and starvation. We decided that earthquakes and tsunamis were the biggest threat this world and everyone living on it.
CONCEPTS: Engineering Design Cycle
1. Identify the need/problem -
2. Research -
3. Brain Storm -
4. Choose the best idea -
5. Construct Prototype -
6. Test and Evaluate -
7. Redesign -
CONCEPTS: Engineering Design Cycle
1. Identify the need/problem -
2. Research -
3. Brain Storm -
4. Choose the best idea -
5. Construct Prototype -
6. Test and Evaluate -
7. Redesign -
Action Plan
We thought of plenty of ways one could incorporate a earthquake resistant structure in a densely populated city. Once the four of us agreed that the younger children should be the priority of this project, we decided that we should build the structure on a school campus so the children have immediate access to a safe and secure shelter in case of a natural disaster. We also realized that it's too expensive to build the structure so we did our research and saw that it would be cheaper to just renovate one of the building already on campus.
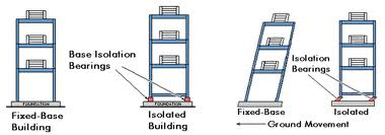
By renovating instead of creating, we can save money on the basic building materials and the structure can have different uses. We chose to renovated the school gym because it is the largest building on campus and it already had the basic structure we wanted. The gym would be given base isolators (see top right figure ^) to allow the building to sway with the earthquake instead of resisting and breaking off the foundation and toppling over causing many deaths and injuries. Base Isolators a basically rubber pads that are inserted between the building and the foundation that allows ease of movement as the plate buckle underneath. Base Isolators cost around $488 per square foot.
By renovating instead of creating, we can save money on the basic building materials and the structure can have different uses. We chose to renovated the school gym because it is the largest building on campus and it already had the basic structure we wanted. The gym would be given base isolators (see top right figure ^) to allow the building to sway with the earthquake instead of resisting and breaking off the foundation and toppling over causing many deaths and injuries. Base Isolators a basically rubber pads that are inserted between the building and the foundation that allows ease of movement as the plate buckle underneath. Base Isolators cost around $488 per square foot.
Reflection
In total, our veteran group did very well. As always, we had some kind of mistake. Ours was when during ,our presentation, Austin's computer shifted to standby mode and he was hosting the map we were presenting. We could have also paid a little more focus toward our project when we worked on it at my house but, for me, that's to be expected when working with awesome group mates such as mine. I think, as a plus, we had the funniest project. We added citizens in our gym which we named after everyone in the class including Mr. Williams' alter ego: MC DUBZ! While we showcased each of the different side rooms, we found Yazeed's citizen in the women's shower. The entire class loved it. I couldn't have done this amazing project without the help of my before mentions group mates: EC, Austin, and Garrett.
SECOND SEMESTER
Passive Solar Home
Our goal for first project of the second semester was to build an energy efficient home that was 120 sq. ft. and that could hold and release its own heat through out the day. We were given $5,000.00 to construct the building. Before we could start the actual construction, me and my group mates, which were Tony Malloy, Yazeed Hamami, and Zach Roesler, had to research the different kinds of materials that could be used to construct our Passive Solar Home. From there, before we went on to the materials lab, we had to learn these:
- Radiation: The absorption and reflection of heat and light.
-Temperature vs. Heat: Variation between heat levels and temperature.
-Specific Heat: The maximum temperature at which can reach.
-Laws of Thermodynamics: The 4 laws that define the properties and characteristics of thermodynamics.
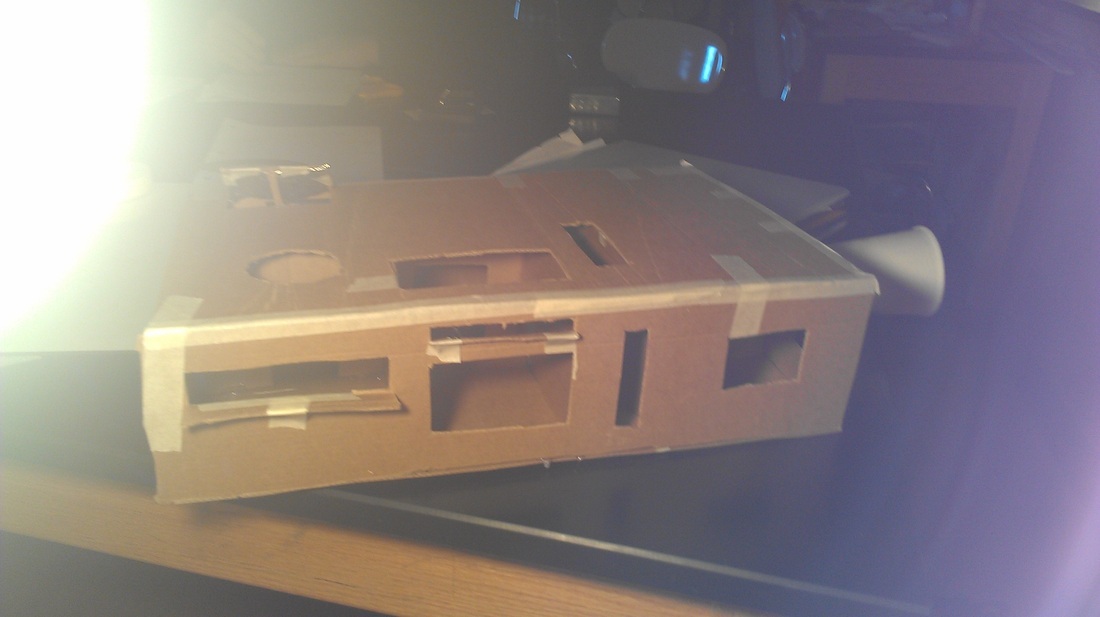
There were a couple of things we did before we conducted our Materials Testing Lab. One of the things we did before hand was a Solar Water Heater, which tested our ability to heat water using only the sun. The materials chosen by our group were chosen based on the thermodynamic capabilities of the materials. The material had to hold in plenty of heat and release it slowly and smoothly. The testing lead to a basic model being built out of cardboard to demonstrate natural lighting. This was our attempt:
- Radiation: The absorption and reflection of heat and light.
-Temperature vs. Heat: Variation between heat levels and temperature.
-Specific Heat: The maximum temperature at which can reach.
-Laws of Thermodynamics: The 4 laws that define the properties and characteristics of thermodynamics.
There were a couple of things we did before we conducted our Materials Testing Lab. One of the things we did before hand was a Solar Water Heater, which tested our ability to heat water using only the sun. The materials chosen by our group were chosen based on the thermodynamic capabilities of the materials. The material had to hold in plenty of heat and release it slowly and smoothly. The testing lead to a basic model being built out of cardboard to demonstrate natural lighting. This was our attempt:
We then went to work on the actual project that was given to us. We started with some hand drawn blue prints. Then we used the drawings to make a 3D model of our house design through Sketch Up. We then decided that the building should be place on the back half of campus on the open lot next to the Auto Shop building. We compiled all of our research, including our Budget Sheet that includes the amount of money we spent, into our Presentation Slideshow.
Our overall project didn't go as smoothly as it should. We spent way more time on messing around than work in my opinion but in the end we got the job done. There were plenty of mistakes that should have been hammered out but were left untouched. Our communication skills weren't the best as well. Why am I stating all the bad things about my own group? We work well once we got focused and coordinated which allowed us to pull of such an interesting assignment.
Our overall project didn't go as smoothly as it should. We spent way more time on messing around than work in my opinion but in the end we got the job done. There were plenty of mistakes that should have been hammered out but were left untouched. Our communication skills weren't the best as well. Why am I stating all the bad things about my own group? We work well once we got focused and coordinated which allowed us to pull of such an interesting assignment.
Home-made Musical Instruments
We were given the mission to create 3 different musical instruments which we would then showcae at a concert. Our group decided to make a wind instrument and a string instrument. Along with those instruments, we thought out of the box and made our other instrument the computer. Although we did use the computer in our project, we didn't use it as much as we could have and later scraped the idea entirely. We chose the computer because our original song idea was a kind of electronic music. Each instrument had to be able to play an entire octave to prove that it does work like a normal instrument should. With our instrments, we had to play any song whether it was original or pre-made. Extra credit was given to any group who made a physics based song and played at the concert. Unfortunately, we were not able to play a full song at the presentation due to a couple of failures after the graded portion of the project. Our presentation was on the same night that we unveiled the Energy Efiicient House that we had been working on.
Wind Instruments:
All wind instrments, including flutes and clarinets, produce notes based off of the embouchure and fingerings used while playing. Each of the different fingerings require a differnt combination of open and closed keys. The notes are played when air is pushed down the tube and controlled by the keys, which cause different wavelengths. The pitch is another importent factor when creating these kinds of instruments. PItch is changed by either adjusting your embouchure or the size of the holes were the keys are placed.
Notes Chart:
Note:
C
D
E
F
G
A
B
C
Wavelength (cm):
65.93
58.74
52.33
49.39
44.01
39.20
34.93
32.97
1/2 Wavelength (cm):
32.965
29.37
26.165
24.695
22.005
19.60
17.465
16.485
Frequency (Hertz):
523.25
587.33
659.25
698.46
783.99
880
987.77
1046.5
String Instruments:
String instruments mainly focus on pitch and can go from good to bad instantly besause of it. The pitch on string instruments is very different from the wind instrumets. Pitch is affected by the tension on the strings. The higher the tension, the higher the frequency and pitch; and lower tension means lower frequency and pitch. String length is also a factor to pitch. Thinner and shorter strings have a higher pitch and thicker, longer strings have lower pitch.
We decided to make a Bucket Bass as our string instrument. We started with a bucket attached to a base made of wood. We then added a neck to the bucket and looped a string of dental floss to the the end of the neck and the inside of the bucket. The length of the string caused us some trouble when trying to play it. We have to put our fingers close to the bucket in order to put the correct amount of tension on the strings. Beyond that, our Bucket Bass is amazing.
Concepts:
Sound waves: Vibrations within a material containing compressions and rarefraction
Compression: Pushing Together
Rarefraction: Pulling Apart
Medium: Required for a sound wave to travel
Amplitude: Distance from midpoint to crest or trough of wave
Wavelength: (m) Distance from crest to crest
Frequency: Amount of vibrations, cycles per min.
Period: Time between waves
Wave: A vibration through a medium
Transverse Waves: Up and Down Waves
Longitudinal Waves: Waves that are compressed horizontally
Pitch: Sound created by frequency
Reflection:
This project taught me more about instruments then I thought I knew. My group wasn't always on top of what was going on, but in the end everything turned out fine. I'm am a clarinetist my self and I now know so much about my clarinet that I didn't know before. Building an instrument is more difficult than you may think. There is plenty of work that goes into making sure that all the parts of your intrument work because one mistake can cause a chain reaction. There were times were I got frustrated when our instrument would play properly, but with some focus, I was able fix the mistake and move on. Overall. the project went well and I am thankful that me and my group were able to get the project done.
Electronics and Circuits
The electronics unit was relitively short in terms of content, but did take a couple weeks to finish.
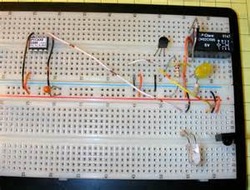
We focused mainly on electricity and how it flows. We used plenty of wires, conductors, a breadboard, some alligator clips and a potentiometer to measure the flow of electricity.
The photo to the right is not exactly what we did but it does give you an idea of what it looks like.
Ohm's Law:
Voltage = Current x Resistance
Resistor Codeing:
1st band: 1st digit
2nd band: 2nd digit
3rd band: # of 0's in the resistance amount
4th band: Tolerance
0 Black
1 Brown
2 Red
3 Orange
4 Yellow
5 Green
6 Blue
7 Violet
8 Gray
9 White
0.1 (+/- 5%) Gold
0.01 (+/- 10%) Silver
Programing:
Along with circuits, we did a bit of coding so we program robots. The type of coding we used was Python, which is used to build web applications and manipulate data. The codeing was done at codecademy.com. I python unit did take up plenty of time even though the estimated time to completion was only 13 hours. I took me roughly 26 hours from start to finish. The coding never got into the robotics phase but we did learn alot about data and how it can be manipulated. Although the programming was a solo unit, we did find teamwork necessary to complete parts of coding that were troubling and frustrating. Programing was amzing and I plan to continue trying other types of code.
Concepts:
Circuit: loop of conductive material + power source
Resistors: Conductors which draw power
Voltage: Push/Pull of electricity, or the power given off by the electricity
Series Circuit: Each bulb = more resistance = less electricity (same current - different voltage)
Parellel Circuit: Each bulb = less resistance = more electricity (independent unless in series with same circuit)
Reflections: Althought this unit was shorter than most other units, I feel like I have learned alot. I started the unit with little to no understanding about any of the material we had to learn, but soon got into the unit and understood the material quite well. There was a bit of trouble between learning how to create SERIES & PARELLEL circuits and how the are affected. The problem was specifically: when you unscrewed one light bulb, what happens to the others? I had to learn how the energy flows through the circuit in order to solve the problem. This was actually quite frustrating becuase the slightest mistake meant that you had to start over. Even with all the set backs that my group had, I still feel that me and group had learned alot about the flow of electricity and patience: especially how much is need in order to accomplish circuits.
